Shopify Inventory Levels: How to Read, Adjust and Fix Them



Shopify inventory levels are stock quantities of an inventory item at one location, split into Available, Committed, Unavailable, Incoming and On hand states.
- Only Available stock is available for sale; Committed, Unavailable and Incoming units cannot be sold.
- When the store says sold out but the admin shows stock, check the location’s online-fulfillment setting first.
- Set To sets the inventory quantity to a specified amount; Adjust By increases or decreases it by a specified amount.
- Back up your inventory CSV before importing, as imports may overwrite existing quantities depending on the file format and options.
How Sumtracker helps: it keeps stock per warehouse in one place and syncs it to your Shopify locations, so you adjust a count once instead of editing stock in two places.
If you’ve ever seen 40 units in your Shopify admin and a “Sold out” button on your store, you’ve encountered a mismatch between inventory levels and product availability. This guide explains Shopify inventory levels, inventory tracking, how to manage inventory across multiple locations and sales channels, and how to fix stock discrepancies.
Before you start: Shopify only shows and adjusts a level once Track quantity is on for that variant. If it isn’t, turn on inventory tracking first.
One SKU at two locations: what a Shopify inventory level holds
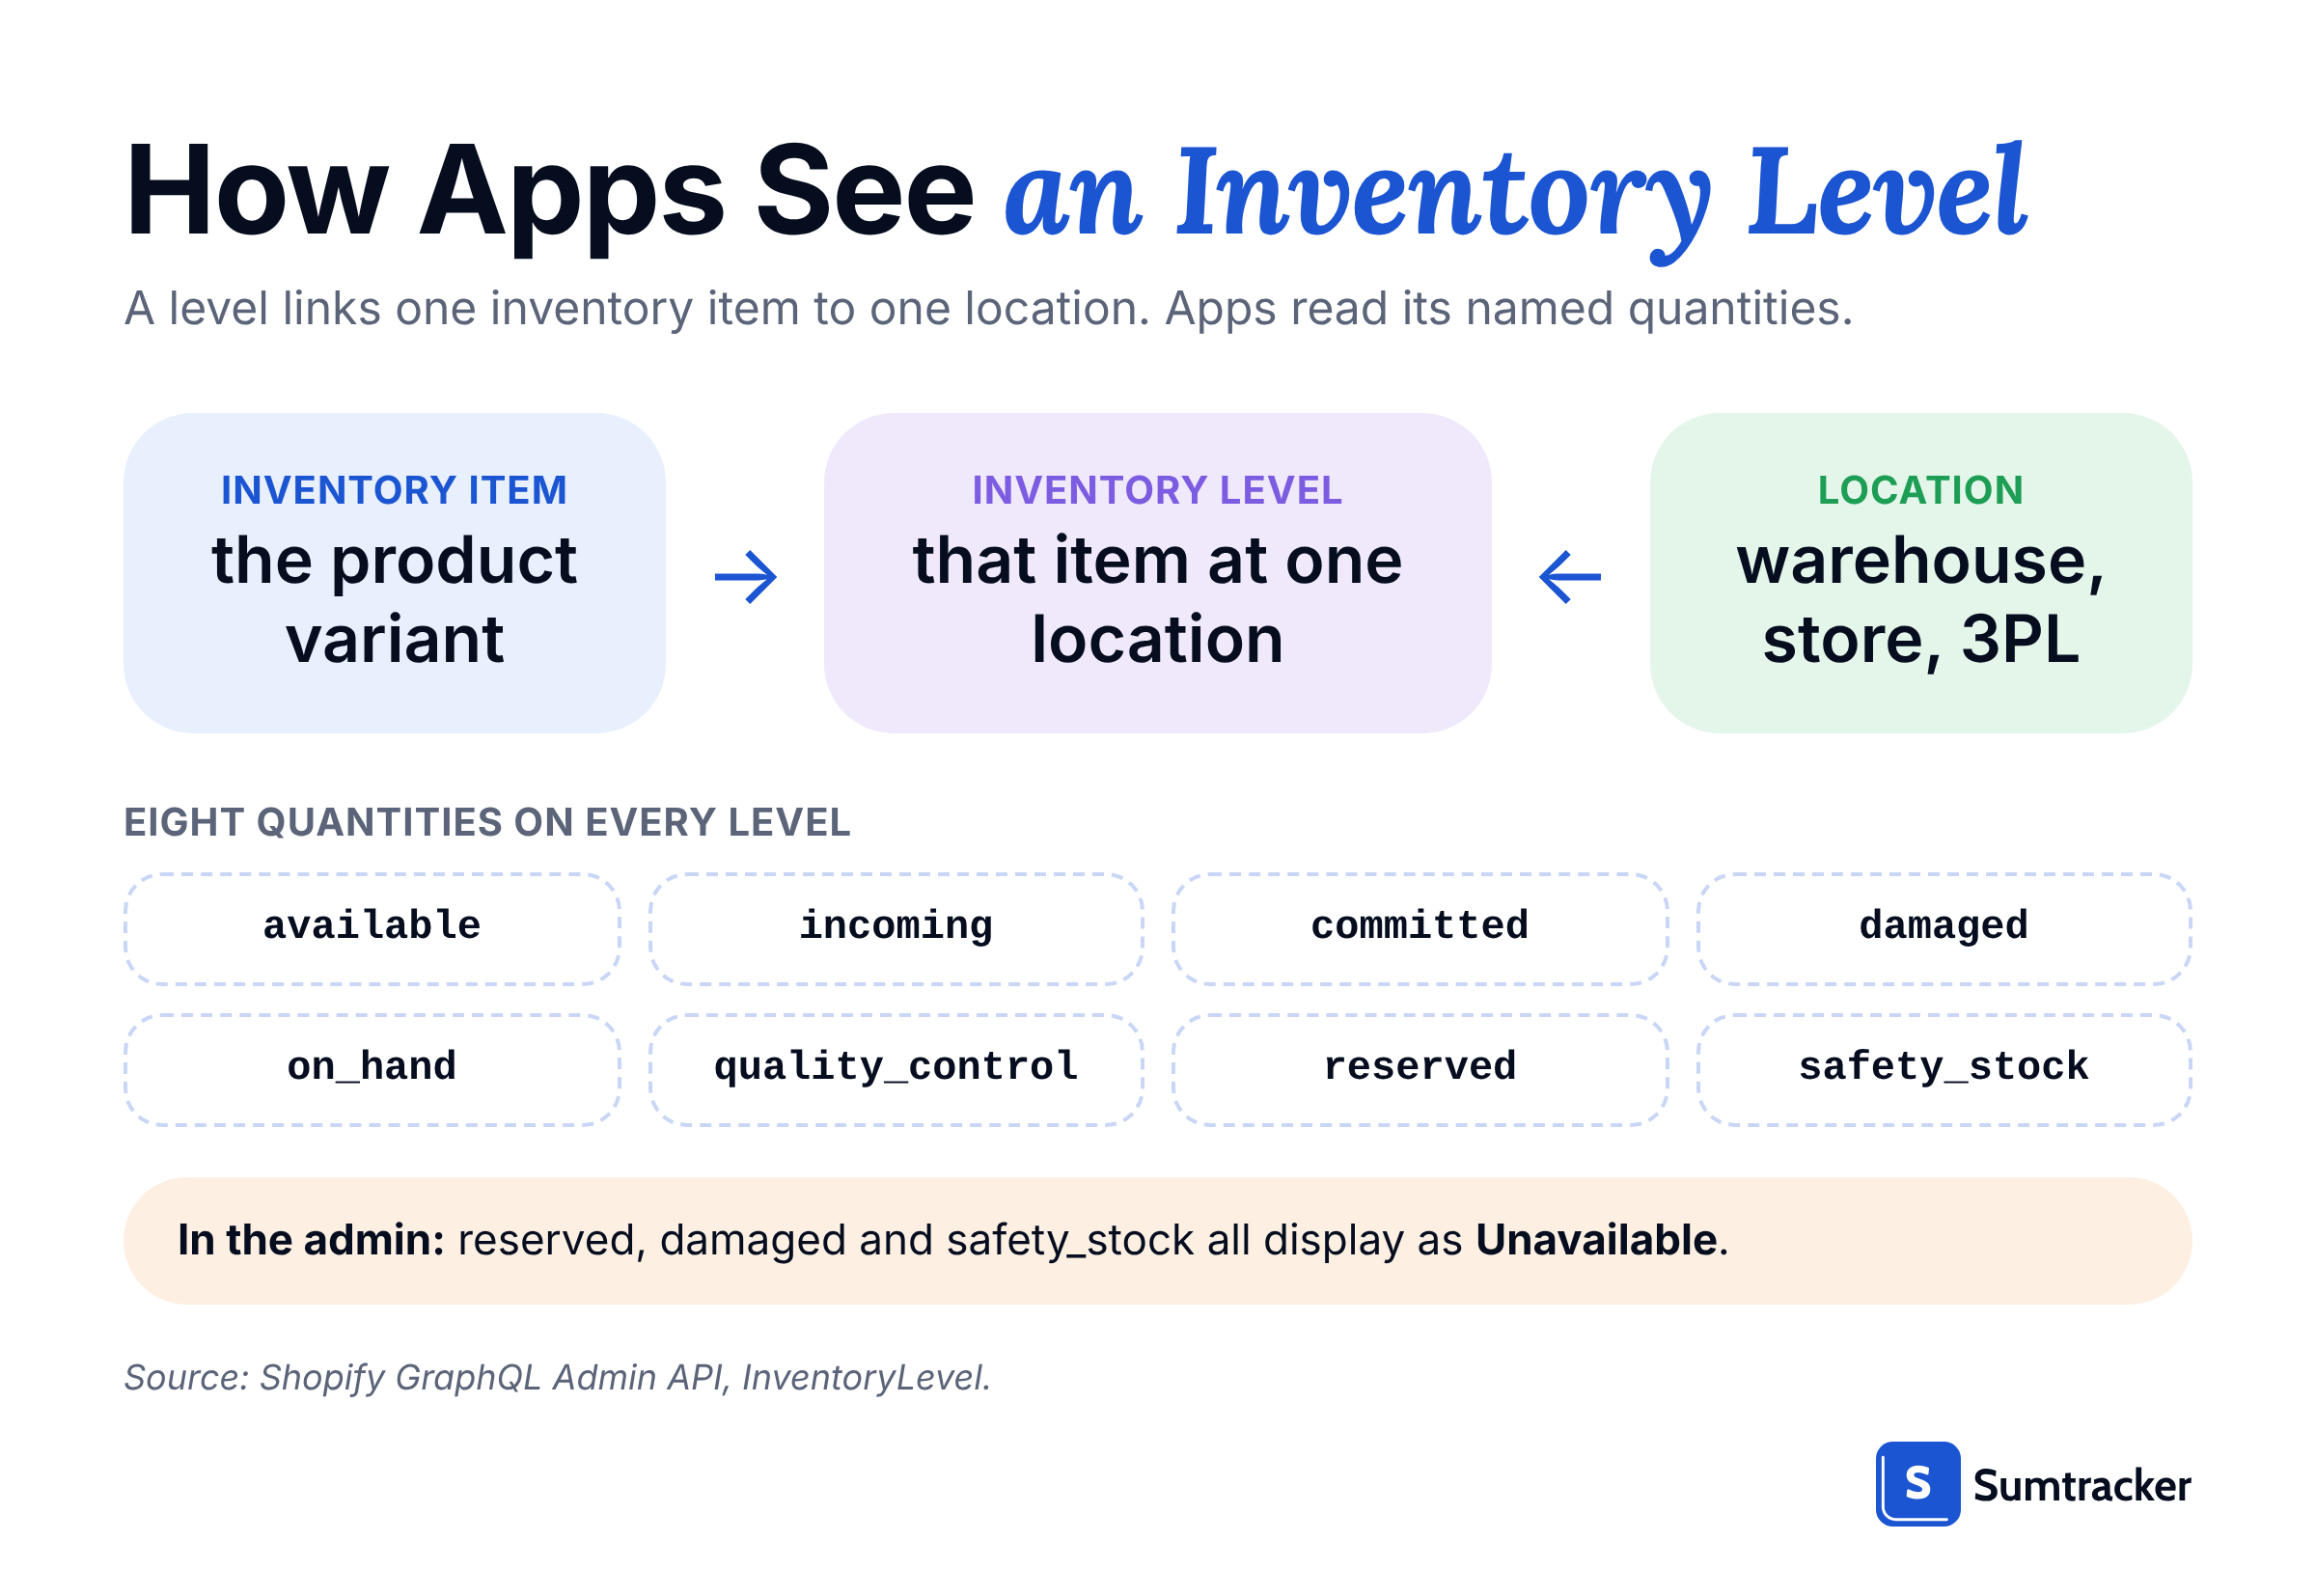
A Shopify inventory level is the record of one inventory item’s stock at one location, stored as several quantity states. Shopify’s developer docs define it as the quantities of an inventory item at a specific location. A variant stocked in two places therefore has two levels, not one.
This inventory data helps Shopify store owners track available inventory and maintain accurate stock levels across multiple locations.

On hand = Committed + Unavailable + Available
Here is one example SKU, a black canvas tote, used for the rest of this guide:
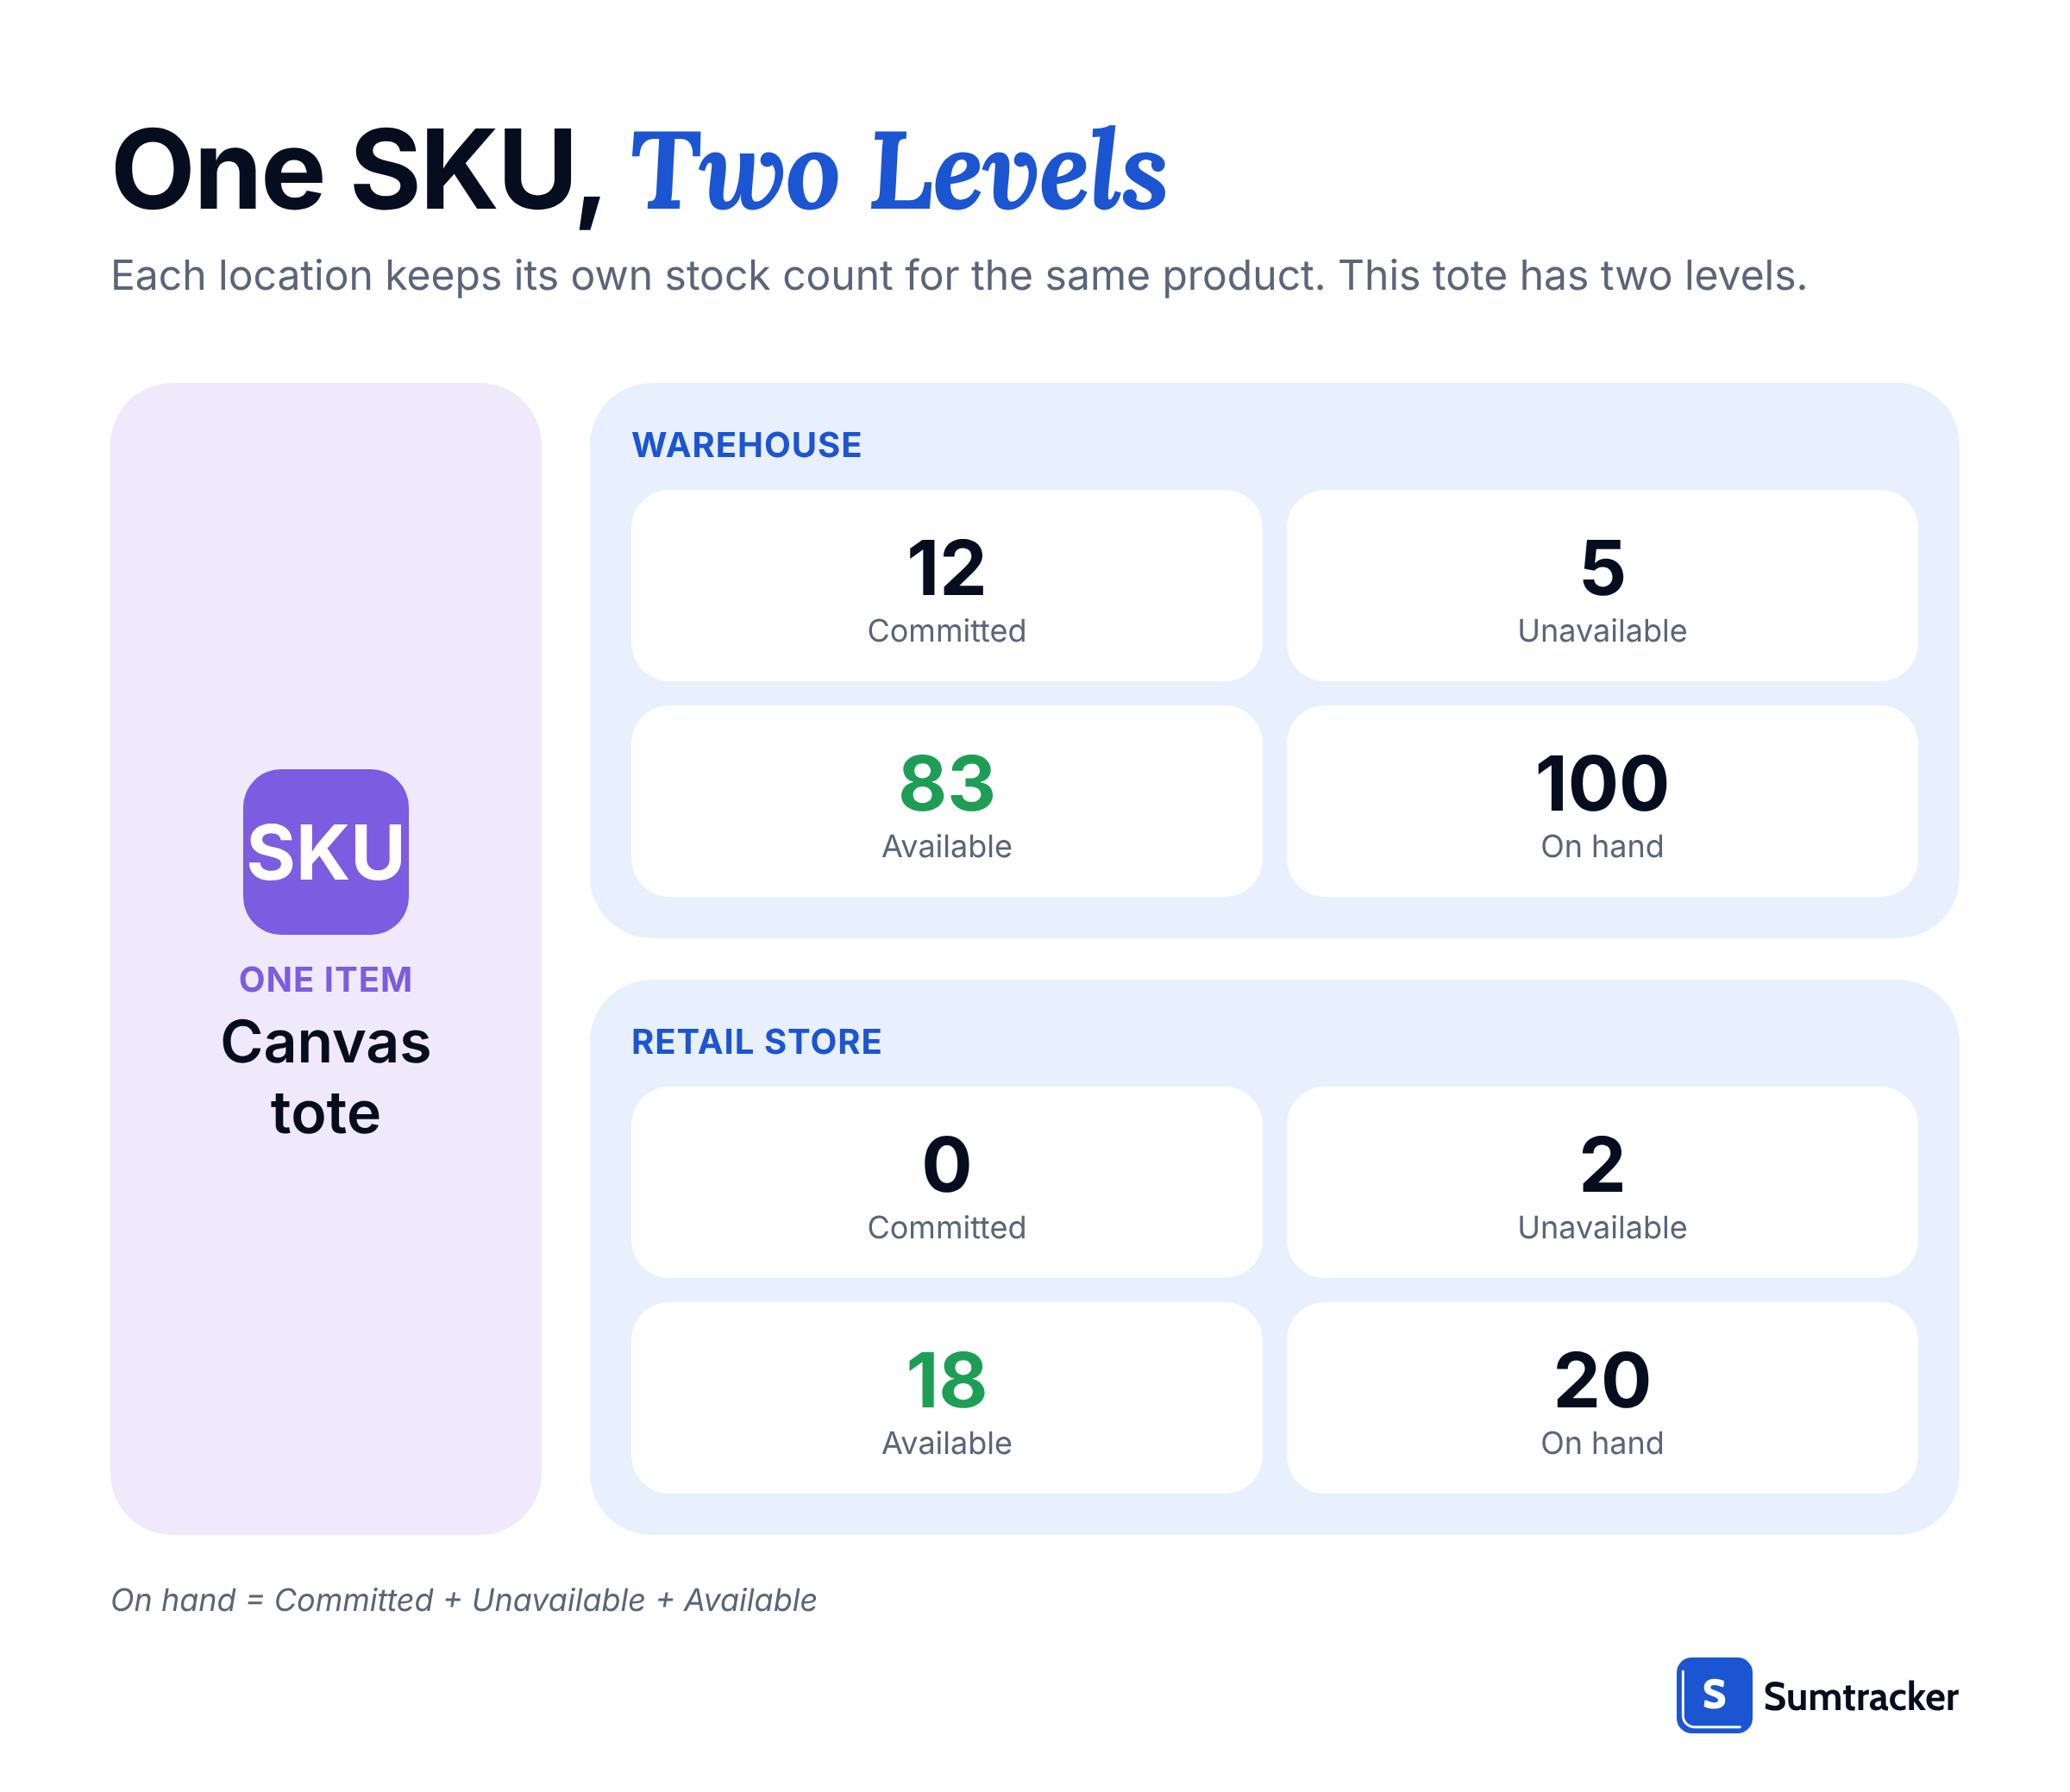
Only locations set to fulfill online orders feed your online store. If the warehouse hits zero, Shopify still shows the item as out of stock online even though the retail store has units. For why 'Committed' rises when orders land, see our committed inventory guide.
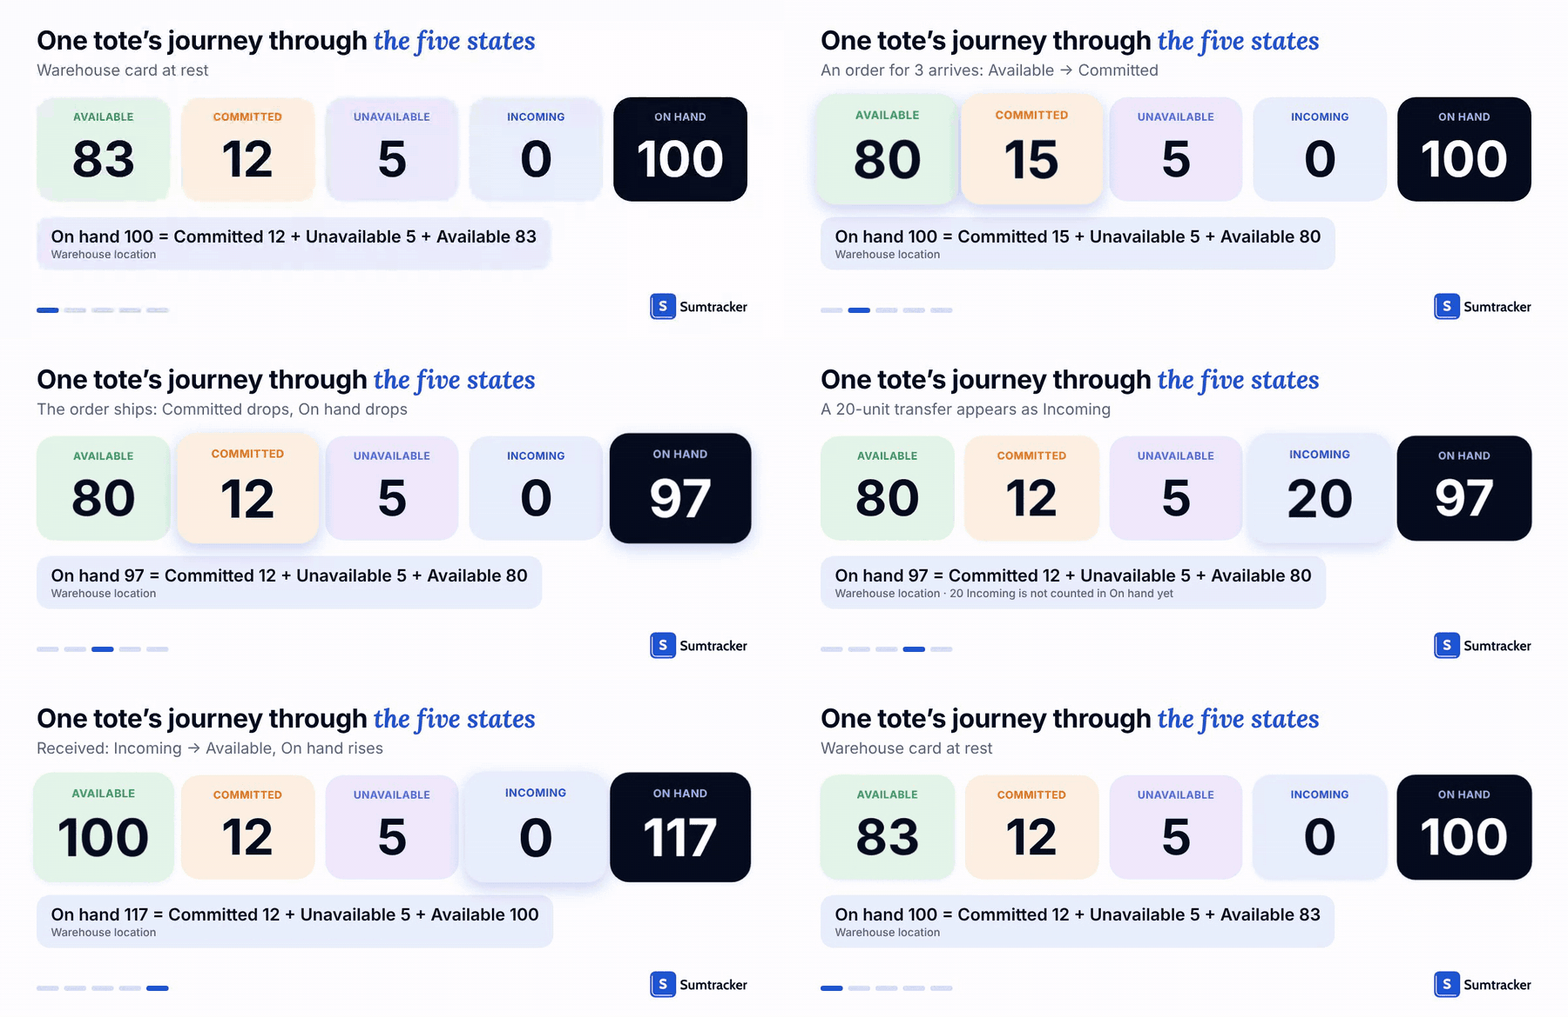
Here is how one location’s numbers move when stock changes state:
How to read Shopify inventory levels in 5 steps, and which number to trust
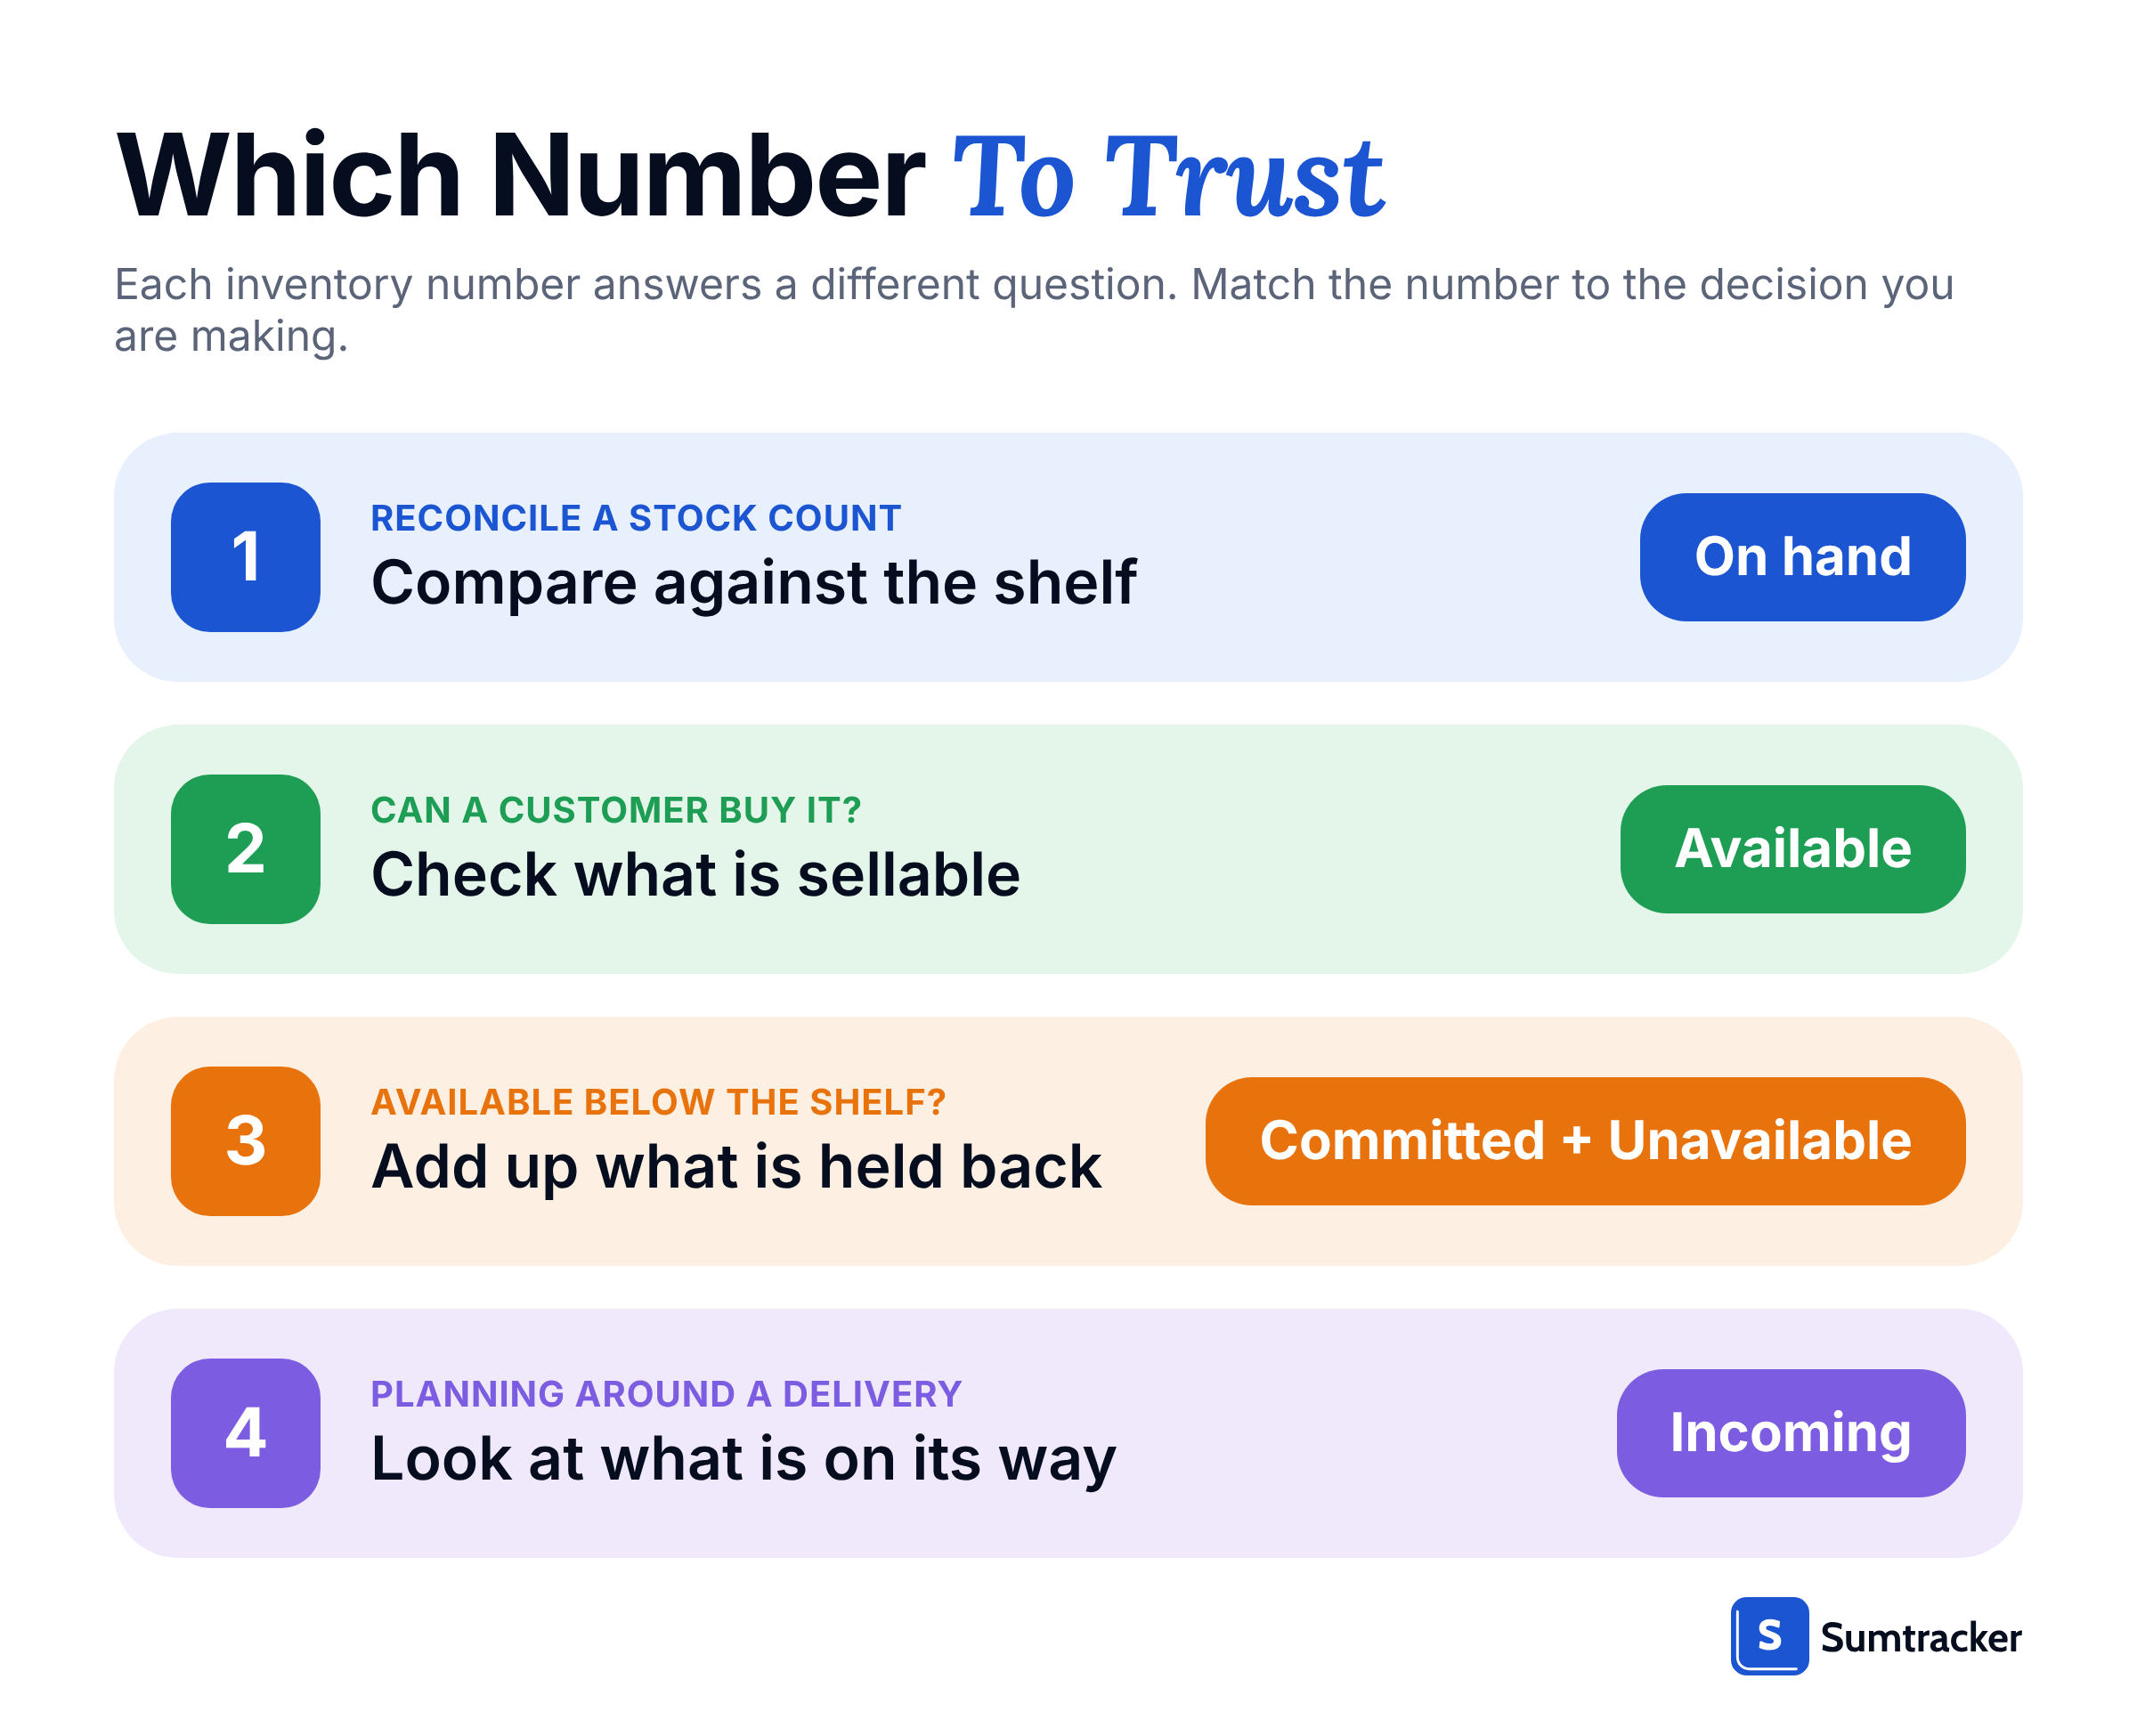
Open Products → Inventory in your Shopify admin, choose one location, and read On hand, Available and Committed together. The right inventory quantity depends on the decision you’re making.
- Go to Products → Inventory in your Shopify admin.
- Select one location at a time, because each location holds its own inventory level.
- For each variant, read the Available, Committed, Unavailable and On hand values.
- Click a variant’s Committed number to see the orders behind it.
- Compare On hand with what’s on the shelf; a gap may indicate a stock discrepancy or inventory adjustment error.
Set To or Adjust By: correcting a level after a stock count
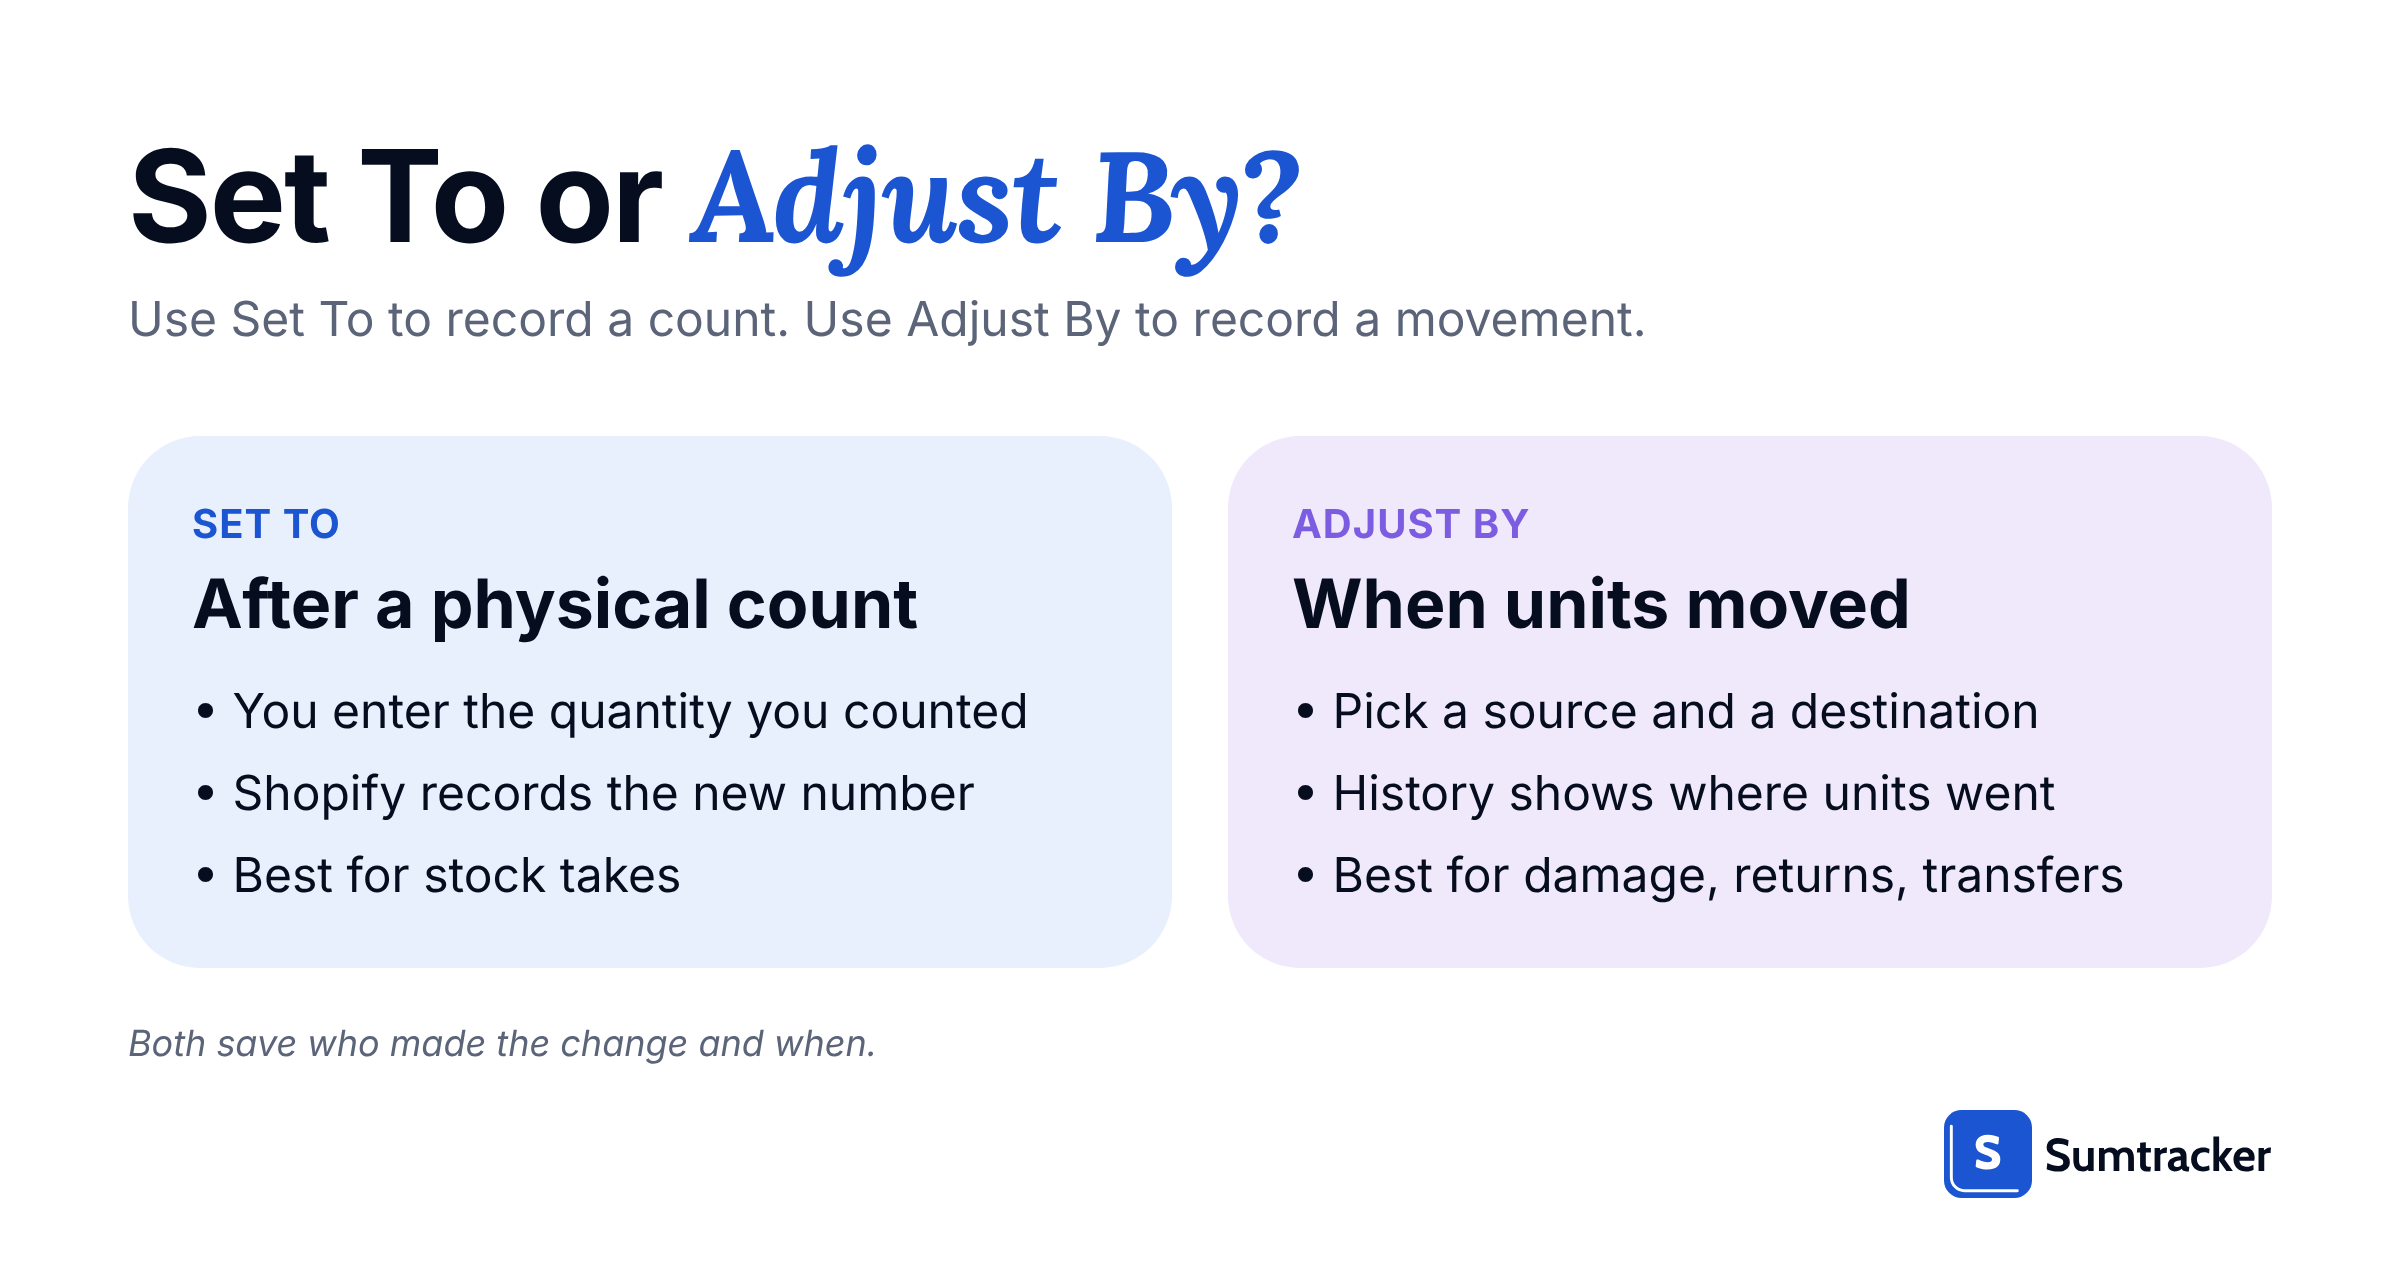
Shopify’s admin offers two inventory adjustment modes. Set To sets the inventory quantity to a specified amount, while Adjust By increases or decreases it by a specified amount. Every adjustment records who made it and when (Shopify changelog, May 7, 2026).
- Open Products → Inventory and click the quantity you want to change, at the right location.
- Choose Set To after a physical count, and enter the counted number.
- Choose Adjust By when the stock quantity changes, such as when units become damaged, and pick the origin and destination for the movement.
- Add a reason if you want one (it’s optional). Shopify lists Correction, Count, Received, Return restock, Damaged, Theft or loss and Promotion or donation. Then click the check icon and Save.
- Open the variant’s Adjustment history to confirm the entry.

Rule of thumb: Use Set To for counts and Adjust By for movements. The Bulk Editor is unchanged, so you can still set Available directly there with no origin or destination.
Common mistake: Saving a count that is already out of date. If stock is fulfilled or received between your count and the moment you save, the number you enter is wrong by that amount. Count in a quiet window, or recheck any variant that moved before you save.
If an inventory app is your stock master: The steps above assume Shopify holds the count. If an app such as Sumtracker is set as the master for a location, adjust stock in the app instead. A change made directly in Shopify’s admin is not something the app detects, so the two numbers drift apart. The master setting depends on your sync setup, so check it for each location before you adjust.
Our walkthrough of viewing inventory adjustment history covers reading the log.
How to bulk-update inventory levels from a CSV without overwriting live counts
Export the current inventory CSV first, edit only the quantity columns, then import. Shopify’s inventory CSV carries one row per location. The all-states version has On hand (current), On hand (new), Incoming, Unavailable and Committed columns; the Available-only version has just Available.
- On the Inventory page, choose Export, select your location(s), and pick the all-states format. Save an untouched copy as your backup.
- Open a second copy in a spreadsheet and change only the quantity columns, leaving the identifying columns alone.
- In the all-states file, change On hand (new). Shopify compares On hand (current) with your live stock, so a row you exported earlier is flagged if the stock has changed since. Shopify calculates Available from the new On hand.
- Save as CSV, choose Import, review the import summary, then start the import.
- Spot-check three SKUs in Products → Inventory and open their Adjustment history.
Common mistake: Importing from the Available-only format. It overwrites Available with whatever is in the file, and that format doesn’t protect against accidental overwrites.
Plug your counts into the sheet below before you upload anything.
For other import options, see our inventory CSV guide.

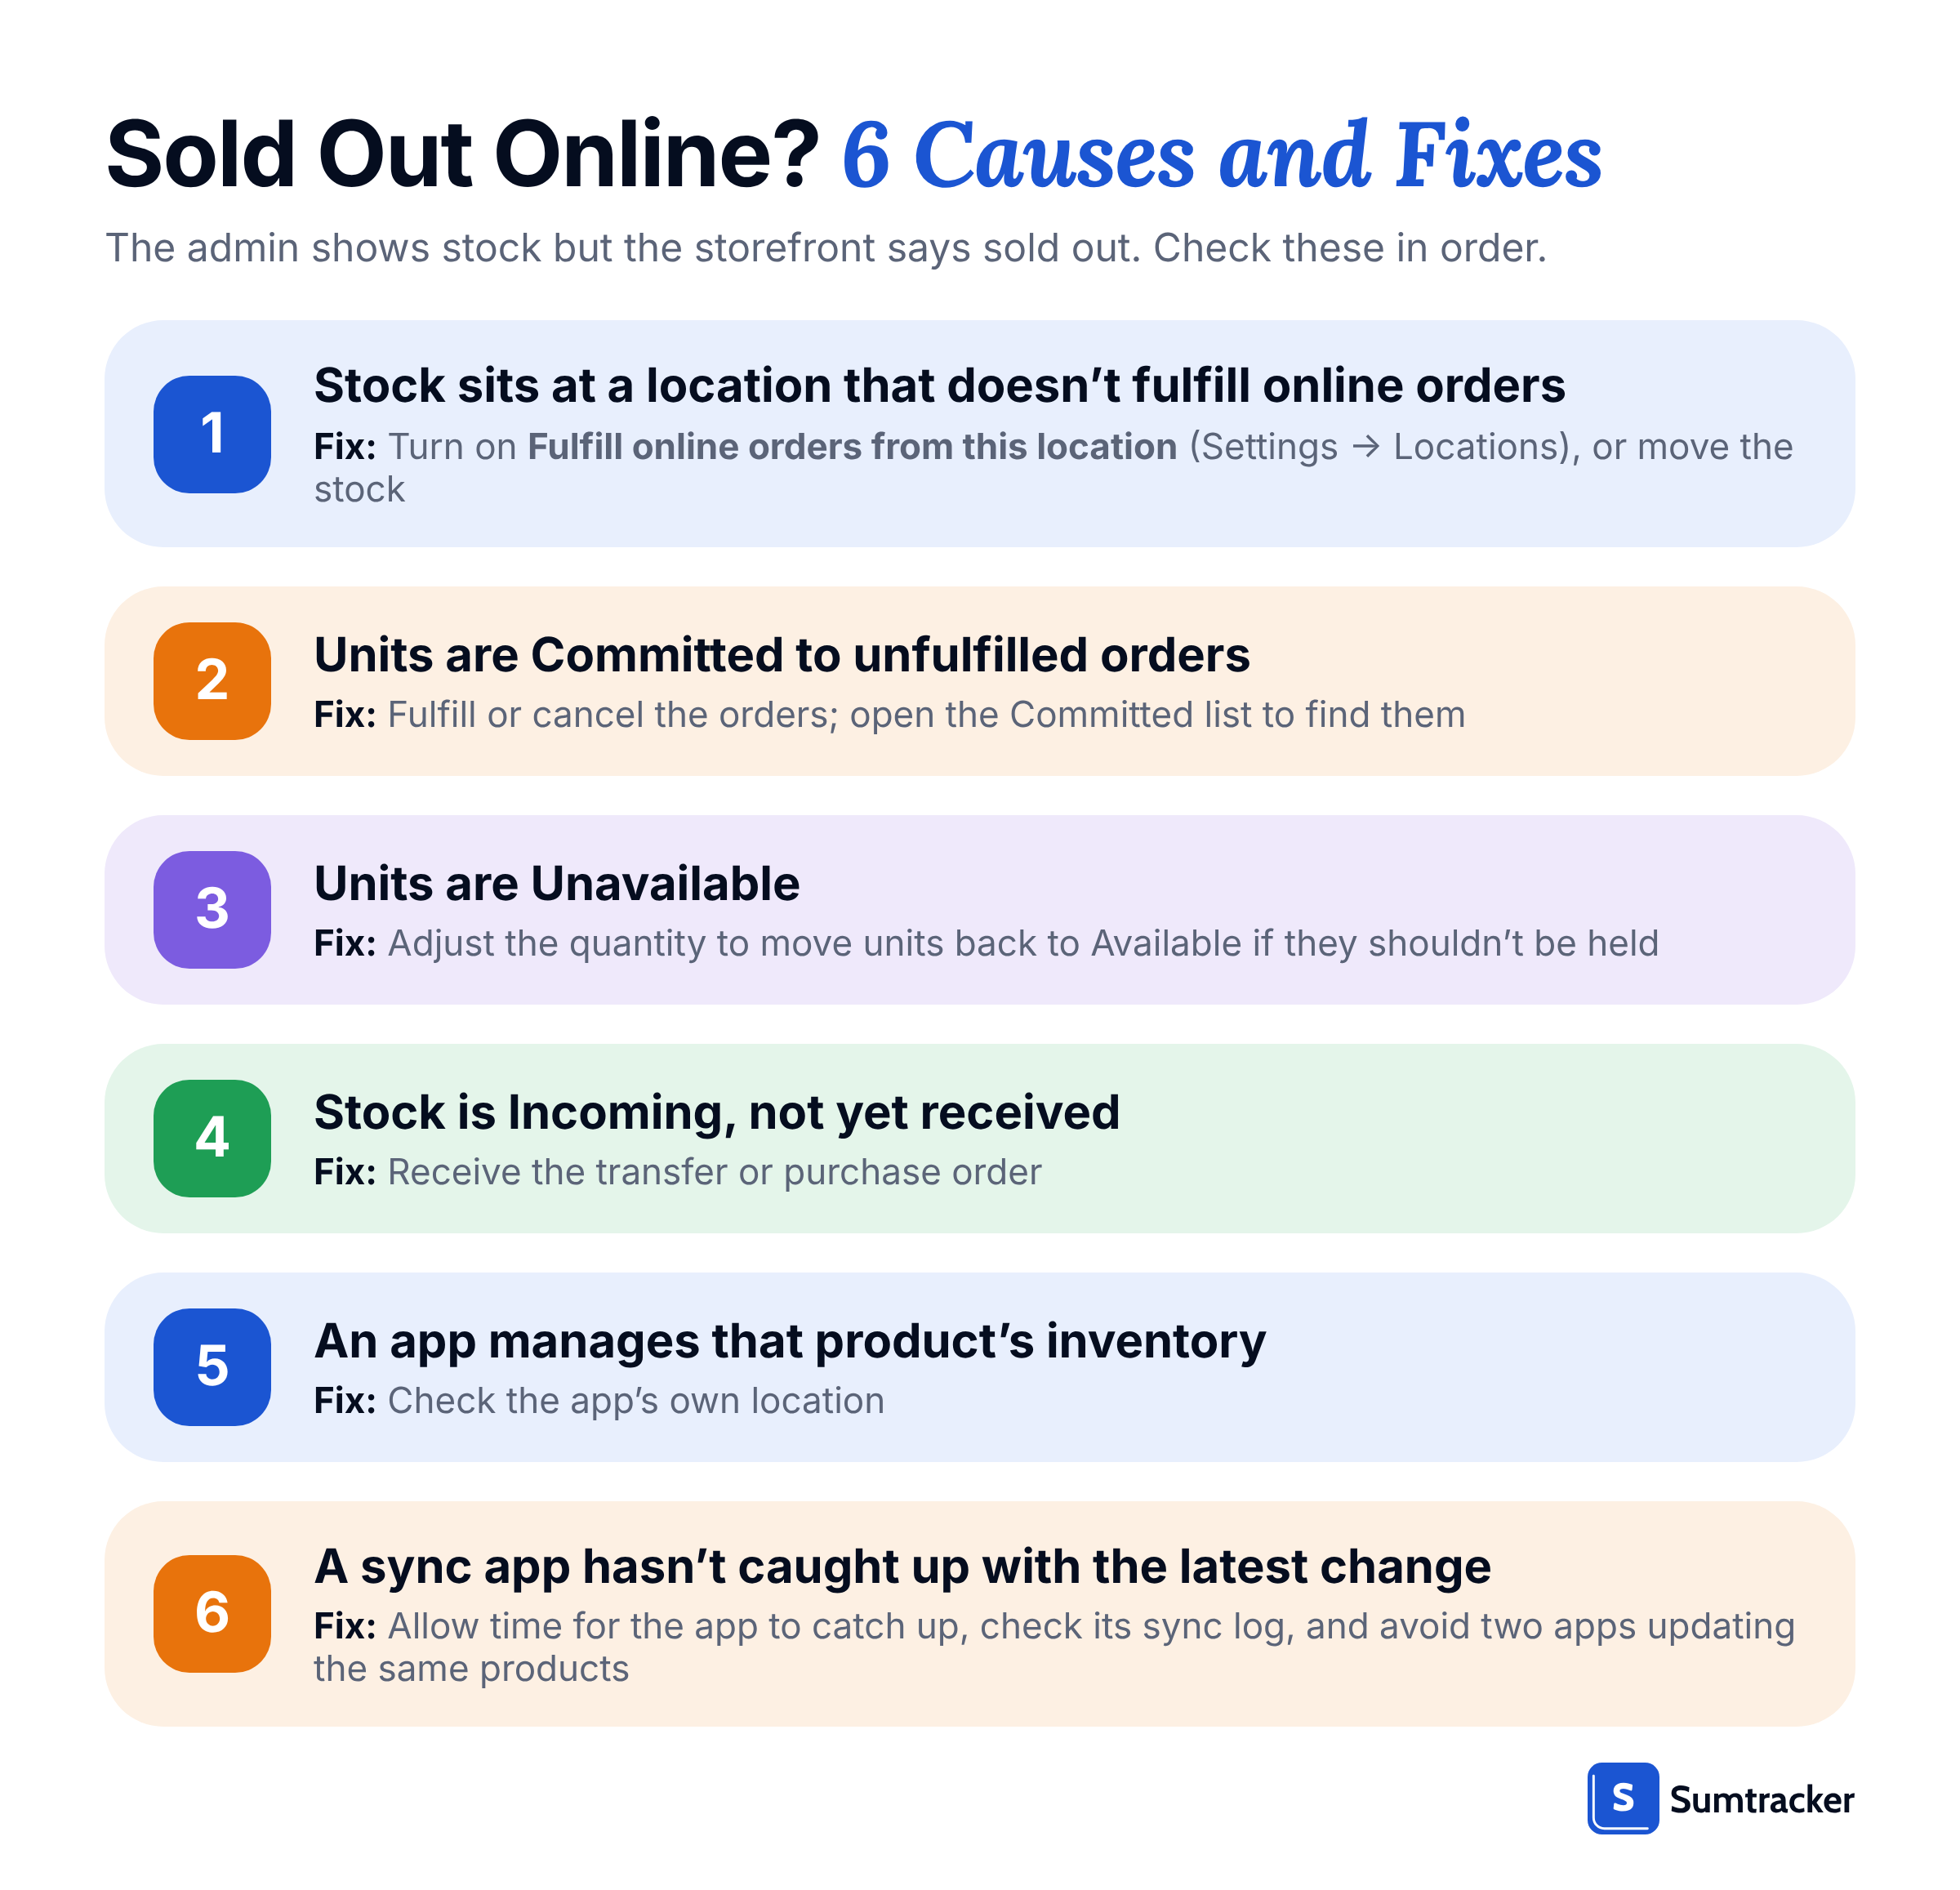
Why the storefront says sold out while the admin shows stock: 6 causes
When the storefront says sold out but the admin shows stock, the units are usually at a non-fulfilling location or sitting in a non-sellable state. Check these six causes in order.
To get stock to the location that fulfills online orders, use a transfer; see moving inventory between locations. If you use an inventory app, also check any reserve or close-at quantity it sets. In Sumtracker, a close-at quantity set on one location hides that location, not the whole product.
Not sure which cause applies? Answer up to five questions to find your cause.

What a level of zero or below means when Continue selling is on
Shopify treats a tracked item as out of stock when its level is zero or below. Turning on Continue selling when out of stock lets customers keep buying anyway. It only works while Track quantity is on and doesn’t apply to POS orders, where staff can sell through zero and below. So Available can go negative.
- Open the product, then the variant if it has options.
- In the Inventory section, check Track quantity.
- Check Continue selling when out of stock.
In one Shopify Community thread, merchants with three fulfillment locations describe a single location going negative while other locations still had stock. Treat a negative level as a prompt to transfer or reorder. Our variant inventory policy guide covers the setting in depth.
What apps and developers see when they read an InventoryLevel
Apps read and write the same level record you see in the admin. Shopify’s GraphQL inventoryLevel query returns the item, the location and a list of named quantities: available, incoming, committed, damaged, on_hand, quality_control, reserved and safety_stock.
Reserved, damaged and safety-stock quantities display as Unavailable in the admin. The inventoryActivate mutation creates a level at a location, and bulk deactivation removes the item’s quantities from that location.
Frequently asked questions
How long does Shopify keep inventory adjustment history?
Shopify shows the last 180 days of adjustment history for each product or variant. History is viewed per variant, not for all variants at once, so export or record anything you need to keep for longer.
Can an inventory level go negative in Shopify?
Yes. When Continue selling when out of stock is on, customers can keep buying past zero, and POS staff can sell through zero too. Available then shows a negative number until you transfer in or receive more stock.
Does Continue selling apply to Shopify POS?
No. Continue selling when out of stock only works while Track quantity is on and doesn’t apply to POS orders. POS staff can sell through zero and below regardless of that setting, so a location can go negative from in-store sales.
Conclusion
Export your Shopify inventory levels to CSV before your next stock count so you have a baseline to compare against. Then run any variant that disagrees with the shelf through the six-cause table above.
If you find yourself repeating this check every week, that is usually the point where a spreadsheet stops scaling. Once stock sits in more than one location, or sells on more than one channel, keeping every level right by hand gets slower and easier to get wrong. Sumtracker keeps stock per warehouse in one place and syncs it to your Shopify locations, so you adjust a count once instead of in each place.
If you want to see how that works with your own products, you can start a 14-day trial below.
Related Articles
Tool and strategies modern teams need to help their companies grow.


Ready to Simplify Your Inventory Management?
Join hundreds of e-commerce merchants who rely on Sumtracker to save time, eliminate errors, and grow their business.